

I love my Steam Deck. For a brief moment, I switched off the handheld in favor of Asus’ ROG Ally, but after several months, I’m back to using my Steam Deck. And a big reason why is because I modded it into the ground.
I’ve changed the hardware and software configuration of my Steam Deck to better suit me. Now, it’s not just a device that can play my PC games; it’s a device that’s personalized with the features and performance I want. I want to walk you through what I did so you can consider exploring Steam Deck modding for yourself.
Hardware modifications
The first thing you need to know about Steam Deck hardware mods is that you can do anything. Short of physically replacing the chipset, there are first- and third-party components for swapping out basically every portion of the device. The main question is what you’re comfortable doing.
For as accessible as the Steam Deck is for repairs and modification, it’s still a compact handheld with a lot of fragile ribbon cables and a barrage of tiny screws. Before doing any hardware mods on your own Steam Deck, I would draw a line at what you’re comfortable doing before seeking out the parts you want to purchase.
My line goes up to the screen. There are even replacement screens such as the DeckHD 1,200p screen, but you’ll also need to remove the display if you want to do a full shell swap. I’ve repaired iPhone screens and swapped the shell on my Nintendo Switch; I’m not interested in doing that again with the Steam Deck. These screens are very fragile, so you definitely don’t want to dive into the deep end if you’re unfamiliar with these types of mods.
I’m going to cover what I did here, but this isn’t a how-to guide. I’d suggest looking up guides on iFixIt if you plan on doing some of your own mods.
A new SSD

So, what did I do? The easiest place to start is an SSD upgrade. Even the 512GB Steam Deck SSD is pitiful with the modern install sizes of games, so I upgraded to a 2TB WD Black SN770M. This is one of the easiest Steam Deck mods you can do, and you can get away with purchasing a cheaper 64GB model if you plan on upgrading the SSD.

There are eight screws on the back that you need to remove before prying it off with a plastic pry tool. Make sure to also remove the micro SD card if you have one installed. With it off, you need to remove three more screws connected to the shield left of the fan, as well as disconnect the battery. Valve graciously includes a pull tab for the battery, making this process simple.

You’ll find the 2230 M.2 SSD underneath. Unscrew and remove it, swap the thermal covering over to your new SSD, and pop it in. I won’t pretend this is an extensive guide on how to do this, so I recommend following iFixIt’s guidance for a full breakdown. This is definitely one of the easiest hardware mods you can make, though, and I highly recommend it.

The only piece of advice I have from doing this process is to use a case to set the Steam Deck in while you’re working. Otherwise, you’ll put pressure on the joysticks and potentially break them. You’ll also want to make sure to back up your saves or sync them with Steam Cloud. You’ll need to completely reformat SteamOS with the new SSD.
Silky smooth joysticks

While you already have the backplate off, there are a few other quick mods you can make. I decided to swap in GuliKit’s Hall Effect joysticks to replace the stock ones. The stock sticks are excellent, but these Hall Effect joysticks are a bit smoother and won’t develop stick drift. And they’re cheap at about $30.

Each of the joysticks has three screws and ribbon cable, and they’re keyed, so they only fit in one way. Pop out the old ones, put in the new ones, and you’re good to go. These particular ones have a switch on the back for the capacitive touch feature on Steam Deck, so make sure to check your controller version before installing them.
The tricky part of this process isn’t the installation, but the calibration. I left the backplate off and held the Steam Deck by the sides, adjusting the tightness of the screws until they felt right. I also used the built-in calibration feature, but it wasn’t perfect. I resorted to using Konsole on the desktop, which has a calibration command (thumbstick_cal) built in.
A ‘cool’ backplate
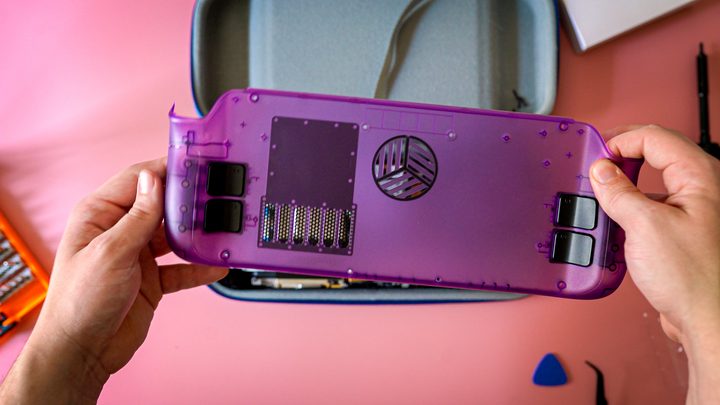
Finally, I went ahead and replaced the back cover, not only to give my Deck a unique look, but also to improve the airflow. I went with the JSAUX PC0106 Vents Version in the Purple color (not Atomic Purple for legal reasons). JSAUX makes several Steam Deck accessories, including the dock I use, so the backplate was a no-brainer.
This one includes cutouts right on top of the intake fan. If you follow the Steam Deck’s airflow, it draws air in through a vent toward the bottom of the back of the device and exhausts it out the top. This extra bit of intake, placed right over the fan, makes that process easier and helps keep the Deck quiet. Plus, it looks cool.
It’s mostly a process of just using the new backplate instead of the original when reassembling. However. JSAUX includes three sets of back buttons of varying heights, and you’ll need to use them instead of the originals. Screw in the ones you want — I chose the standard height because that’s what’s most comfortable — and install the backplate. There’s a covering over a thermal pad on the back, so make sure to remove that before installing.
Software modifications
Hardware is only half of the story with the Steam Deck. You can also seriously mod the software. Of course, you can install Windows 11 on the Steam Deck, but I’m far more interested in the applications that have been built specifically to run on the handheld.
EmuDeck opens up decades’ worth of games

One of the first things I did was install EmuDeck. This is an all-in-one emulation tool built, as you might have guessed from the name, specifically for Steam Deck. It installs and configures all of the emulators you could want in a single package, and it even brings your emulated games into the Steam environment so you can launch them like any game in your library.
I highly suggest following the guide from Retro Game Corps for setting up EmuDeck, but a text guide is available as well. EmuDeck itself is fairly straightforward, but Steam ROM Manager is a major component of the app. Steam ROM Manager basically adds non-Steam games to your handheld view, as well as grabs metadata like cover art. It can do this automatically, but you’ll start the process of parsing metadata manually. That’s covered in the tutorial.
I won’t cover how to get ROMs here — you’ll need to figure that out on your own — but you need to get them on your micro SD card. EmuDeck automatically creates a folder structure, so all you need to do is drag your ROMs into the correct platform. It also creates a BIOS section for emulating platforms like the PlayStation 2.
Now, you can hook up a keyboard and mouse to your Steam Deck and do all of this on the device. That’s kind of a pain, though. I configured all of my ROMs on my Windows laptop using Paragon’s Linux File Systems for Windows. When you install EmuDeck, you’ll need to format your Micro SD card to the Linux file system, which will make it unreadable on Windows. This app allows you to copy files to your Micro SD card on a Windows PC, and it’s super handy.
Decky Loader for everything else

The other essential on the software front is Decky Loader. It doesn’t do anything on its own, but it’s an open-source loader that brings plug-ins to your Steam Deck. There are a ton of plug-ins for you to use, all of which you can access through Gaming Mode. Everything from battery management to custom themes to VPN support is available. There are 56 plug-ins available at the time I’m writing this.
Downloading Decky Loader is simply a matter of going to the Github page and installing it from the desktop view on the Steam Deck. From there, you’ll want to experiment with the different plug-ins to see what’s useful to you. Here’s what I’m currently using:
- CSS Loader: This is essentially a theme plug-in for your Steam Deck. You can browse community themes or build and import your own. You can also mix and match elements from different themes if you want.
- HLTB for Deck: This adds How Long to Beat stats above your games, showing you how long they take to complete, in the Steam Deck library. It’s very useful to have.
- MangoPeel: This gives a greater range of options for the performance overlay on Steam Deck.
- Storage Cleaner: The Steam Deck creates a shader cache for your installed games so they don’t stutter during gameplay, but these caches can take up a lot of space. This plug-in allows you to see and delete the cache to free up space. Don’t worry, the cache will be recreated when you want to play the game.
- ProtonDB Badge: It adds badges to your library from ProtonDB to show you if the game will work on Steam Deck. It’s very useful for games that don’t have Deck Verified status, but still may work.
- Bluetooth: It gives you access to your Bluetooth devices through the quick access menu so you don’t need to dig through the settings.
- Animation Changer: It allows you to download and use custom boot and suspend animations.
My selection is mostly focused on cosmetic changes, but there’s so much more available in Decky Loader. You can set up cloud saves for games that don’t support it, add fan controls to the Deck, and even add background music to game pages in your library. It’s an all-in-one tool for the Steam Deck with a growing list of plug-ins.
Thank you, Valve
You can mod the hell out of the Steam Deck, and it seems that was an intentional design decision from Valve. Try to do even a basic mod on something like the Nintendo Switch — hardware or software — and you’ll be sent down a rabbit hole of half-baked forum posts and dubious downloads. Oh, and you might have your account banned in the process, too. No fun.
On the Steam Deck, there’s a vibrant ecosystem of hardware and software that’s relatively free of issues. That allows you to get better performance out of the device if you wish and customize it so that it’s unique to you. The flexibility of the Steam Deck is truly astonishing, which is a big reason why it’s such a prominent device a year-and-a-half after it launched.
I’ve settled on a list of hardware and software mods that make my Deck much more useful for my purposes, but there’s a lot of flexibility here. If you haven’t considered going down the path of Steam Deck modding, I would urge you to do so, even if it’s something as simple as a storage upgrade.


