
Animal Crossing: New Horizons launched in March 2020. It was all the rage during the pandemic while gamers remained confined to their homes. However, there was one glaring issue from the start: Islands were locked down to individual Switch consoles. They couldn’t be saved to the cloud nor moved to another Switch. That meant no recovery if the Switch was stolen, lost, or damaged beyond repair. Hours upon hours of island-building gone forever.
Nintendo backtracked on its decision and introduced cloud backup as part of the July 2020 update. This creates a copy of your island in the cloud but requires a Nintendo Switch Online subscription.
Nintendo followed up with the ability to transfer an island or resident in the free winter patch issued on November 19. It’s joined by the free Animal Crossing: New Horizons Island Transfer Tool now available on the Nintendo eShop.
In this guide, we show you how to transfer save data from one Switch to another in two ways: Move the entire island, or move just a resident.
Further reading
- The coolest Animal Crossing: New Horizons islands
- How to make money in Animal Crossing: New Horizons
- How to time travel in Animal Crossing: New Horizons
Moving an island

When moving to a new Switch and selling the old
Use these steps if you’re moving to another Switch and don’t plan to use the source console. For example, you may be upgrading to the standard Switch console and handing off a Switch Lite to a family member or friend — or trading it in to GameStop.
Step 1: Make sure Animal Crossing: New Horizons is up to date on the source console.
Step 2: Download the Animal Crossing: New Horizons Island Transfer Tool listed on the Nintendo eShop. You may need to do a search to actually find it once it leaves the shop’s Features tab.
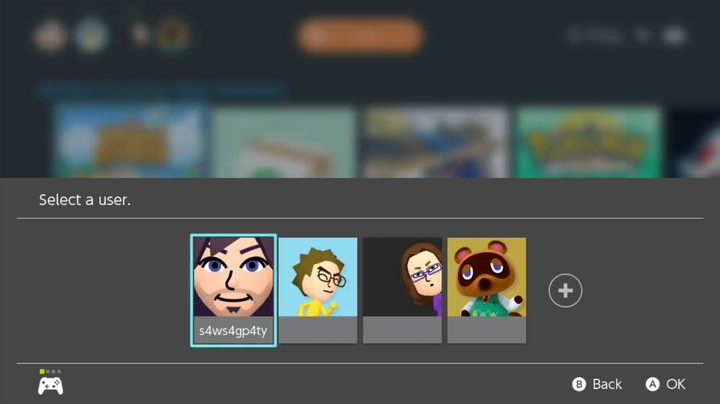
Step 3: Transfer all user data to the new Switch console using our separate guide. Repeat this step for all users associated with the source Switch console.
Step 4: On the target Switch console, update Animal Crossing: New Horizons.
Step 5: Download the Island Transfer Tool listed in the Nintendo eShop.
Step 6: On both consoles, open the Island Transfer Tool.
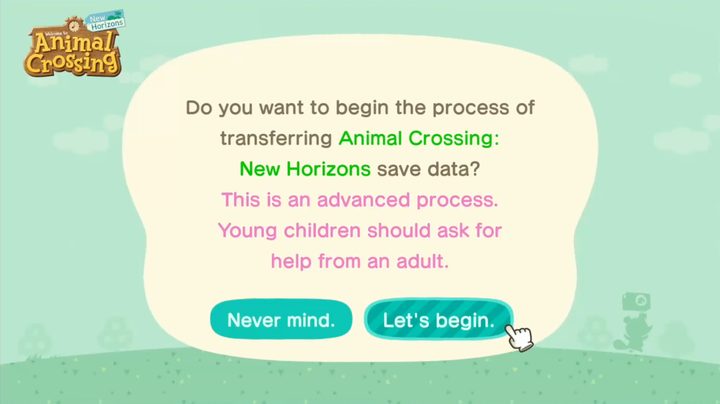
Step 7: Follow the instructions and select Continue on both.
Step 8: Select Let’s Begin on both.
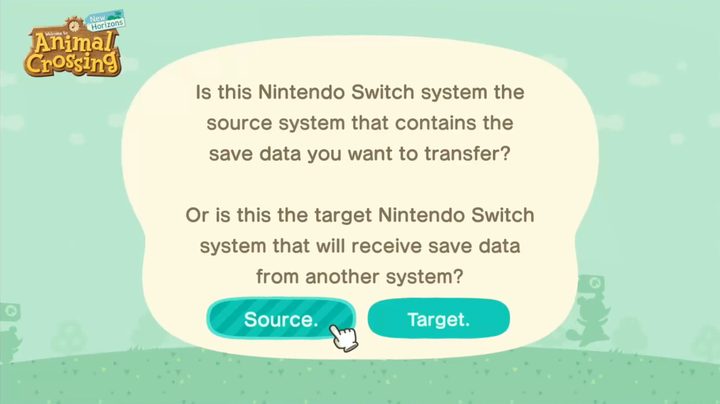
Step 9: On the source Switch console, select Source.
Step 10: A message says that save data has been detected. Select Continue. The source Switch will now search for the target console.
Step 11: On the target Switch, select Target.
Step 13: Select Proceed.
Step 14: On the source system, select Transfer Data after it detects the target console.
Step 15: On the target system, select Proceed when it detects the source console.
Once the transfer is complete, the island on the original source console will be deleted. Open Animal Crossing: New Horizons on the new Switch console to continue playing. You’ll need to set up island backup again on the new system.
When moving to a new Switch but keeping the old
Use these instructions if you plan to keep both consoles, but prefer to play Animal Crossing: New Horizons on the target console instead. The only real difference here is that you’re not transferring accounts as seen in the first instruction set.
Step 1: Update Animal Crossing: New Horizons on both consoles.
Step 2: Download the Animal Crossing: New Horizons Island Transfer Tool on both systems.
Step 3: Open the Island Transfer Tool on both systems.
Step 4: Follow the instructions and select Continue.
Step 5: Select Let’s Begin on both.
Step 6: On the source Switch console, select Source.

Step 7: A message says that save data has been detected. Select Continue. The source Switch will now search for the target console.
Step 8: On the target Switch, select Target.
Step 9: Select Proceed.

Step 10: On the source system, select Transfer Data after it detects the target console.
Step 11: On the target system, select Proceed when it detects the source console.
Once the transfer is complete, the island on the original source console will be deleted.
Step 12: On the target system, open Animal Crossing: New Horizons and select Existing Data when prompted.
Step 13: Select your resident name if there are multiple residents with existing unlinked data.
Step 14: Select Yes to confirm that you want to start playing again as your resident. Repeat Steps 12-14 for all other residents.
You’ll need to set up island backup again on the new system.
Moving your resident

Use these instructions if you created a resident on the source Switch console but want to live on a different island on the target console. However, if you created an island on the source console, you’re the designated Island Representative and absolutely cannot move without taking the entire island with you.
Step 1: Update Animal Crossing: New Horizons on both systems.
Step 2: Open Animal Crossing: New Horizons on the source console and select the player (resident) you want to move.
Step 3: On the title screen, press the minus button to open the game’s settings.
Step 4: Select Move to a New Island.
Step 5: Select Move Me Off the Island.
Note: The only way to move an island representative is to transfer the entire island.
Step 6: Select Yes, That Is Correct to confirm the move.
Step 7: Select Yes, I’m Ready! after confirming the details.
Step 8: Select Yes, I’m Ready! again.
Step 9: Move to the target Switch system, launch Animal Crossing: New Horizons, and select the target user account.
Note: You cannot move a resident to a target account that’s already played Animal Crossing: New Horizons on the target Switch console.

Step 10: When prompted, select I’m Moving.
Step 11: When prompted about the transfer request, select Yes, I Have!
Step 12: Select Start the Process and the target Switch will search for a transfer request.
Step 13: When your resident’s name appears, select Yes, That Is Correct to confirm.
Step 14: Move to the source Switch system and select I Want to Move to confirm.
Note: You cannot cancel the transfer at this point. Your bags are packed.
Step 15: Close the game on the source console once you see a message stating “Thank you so much for waiting. Everything is ready!”
Step 16: Move to the target console and choose a location for your existing house.
Note: If you’re the first resident, then you become the representative and will be forced to sleep in a tent during the first night. If you’re not the first resident, your house appears on the island immediately.
Moving another resident
Use these instructions if you’re the Island Representative and another player wants to move to a different island on the target console.
Step 1: Transfer the user data from the source Switch to the target console.
Step 2: Update Animal Crossing: New Horizons on both systems.
Step 3: On the source console, open Animal Crossing: New Horizons using the account of the player you just transferred to the new system.
Step 4: At the title screen, press the minus button to open the game’s settings.
Step 5: Select Move to a New Island.
Step 6: Select Move Another Resident.
Note: The only way to move an island representative is to transfer the entire island.
Step 7: Select Yes, That Is Correct after selecting the name of the resident you want to move.
Step 8: Select OK after reviewing the transfer details.
Step 9: Select Yes, I’m Ready!
Step 10: Select Let’s Do It! to send the transfer request.
Step 11: Move over to the target Switch console and open Animal Crossing: New Horizons using the newly transferred user.

Step 12: Select I’m Moving when prompted.
Step 13: When prompted about the transfer request, select Yes, I Have!
Step 14: Select Start the Process.
Step 15: Once the player’s resident appears on the screen, select Yes, That Is Correct.
Step 16: Move back to the source console and select Let’s Do It!
Note: You cannot cancel the transfer at this point. Your bags are packed.
Step 17: Close the game on the source console once you see a message stating “Thank you so much for waiting. Everything is ready!”
Step 18: Move to the target console and choose a location for your existing house.
Note: If you’re the first resident, then you become the representative and will be forced to sleep in a tent during the first night. If you’re not the first resident, your house appears on the island immediately.


