Thanks to iOS 12, we received a number of welcome improvements to Face ID, the facial recognition sign-in option available on the iPhone X and newer models. However, one of the best improvements was the addition of an “alternate appearance” or the ability to program in a second face for your iPhone to recognize.
This is an incredibly useful new option, whether you want to make sure that a loved one can open and use your phone, or just want your iPhone to recognize you with goggles or work equipment on (something Face ID is getting better at, but it can still prove challenging). We’ll show you how to set up an alternate appearance for Face ID right here with just a couple minutes of work.
Step 1: Navigate to Face ID & Passcode
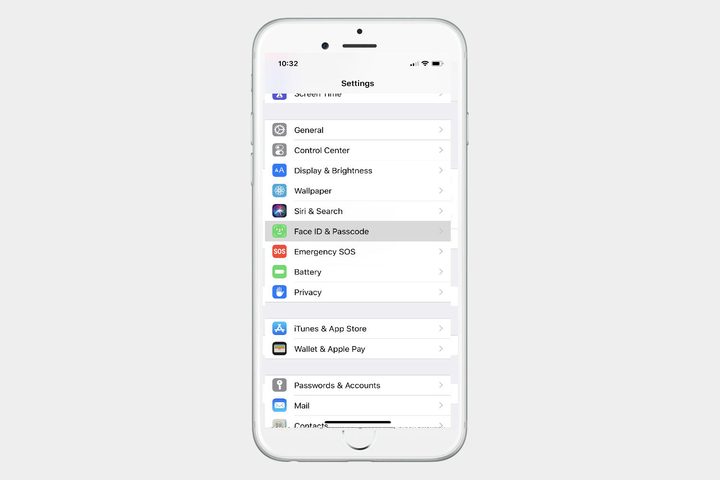
Pick a spot with good lighting and no potential glare, and unlock your iPhone. Head to Settings (the gear icon), and look through the Settings menu until you come to Face ID & Passcode. Select it.
Step 2: Start the alternative appearance process
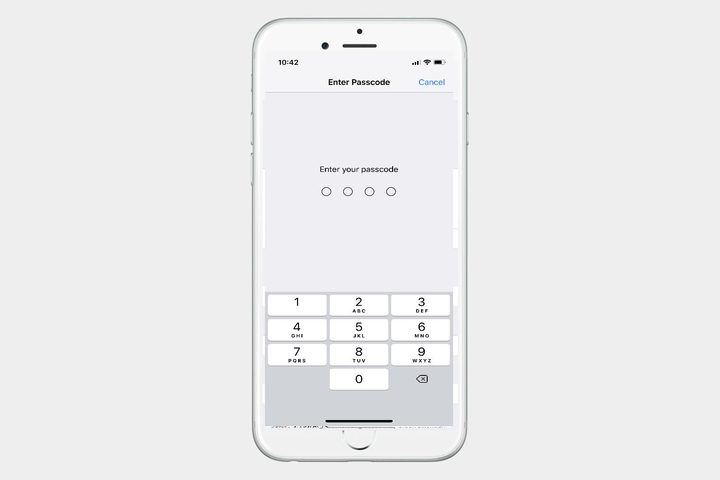
At this point, you will probably have to enter your passcode to continue. Once logged into Face ID & Passcode, you should see options for enabling Face ID App Store purchases, Apple Pay, password autofill, and other options. It’s worthwhile scanning through these options to make sure they are enabled or disabled as you prefer, especially if you are adding a second person to Face ID.
When you are ready, look below the option to enable and you will see the option to Set Up an Alternative Appearance. Select this to begin.
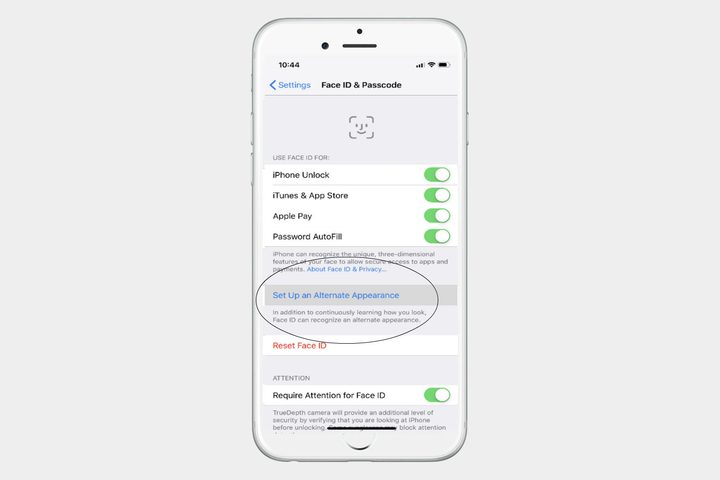
Note: This is assuming that you have already set up your first Face ID face and passcode. If you haven’t set up Face ID yet, then you will see an option to “Set Up Face ID.” You will want to select this first. If you haven’t set up a passcode yet, then you will be prompted to create a passcode when opening Face ID & Passcode. We recommend creating a passcode, since having a reliable second method to unlock your phone is useful, especially if the camera ever malfunctions.
Step 3: Scan the face
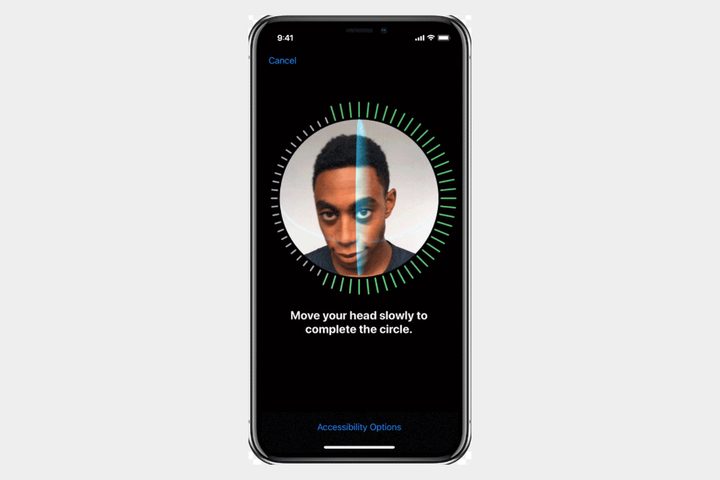
Now you will need to scan in the alternative face. Whether this is a loved one or just you with some obscuring clothing, get ready. A face portrait will appear and your iPhone will instruct you to move your face around in a circle to properly calibrate the sensor. Do this until the iPhone is satisfied and reports that the face scan is complete.
If you have trouble with this process, remember that your face needs to be centered and that your iPhone shouldn’t be angled away. You may need to find better lighting or readjust your position to improve the scan. It usually takes a couple of circles around to fully complete the scan.
When finished, you’re done. The iPhone Face ID will now scan for both face data sets, and will unlock for either of them. You can test the function out immediately to make sure it works.
Step 4: When necessary, replace your alternate appearance
Now, when you go into Face ID & Passcode, you will only see an option to “Reset Face ID” that has replaced the alternate appearance option. Be careful when choosing this option: It will erase all your Face ID data, then ask you to scan in two new faces consecutively. However, it’s also the only way to get rid of an alternate appearance and replace it. Make sure both faces you want to scan in are ready if you hit reset.